data augmentation : 데이터 증강
다양한 유형의 학습 이미지 데이터 양을 늘리는 것이 좋은데 쉽지 않음
=> 원본 학습 이미지 개수를 늘리는 것이 아니라 학습 시마다 개별 원본 이미지를 변형해 학습 수행하는 것 = 데이터 증강
augmentation 유형 - 공간 레벨 / 픽셀 레벨
-공간 레벨 변형
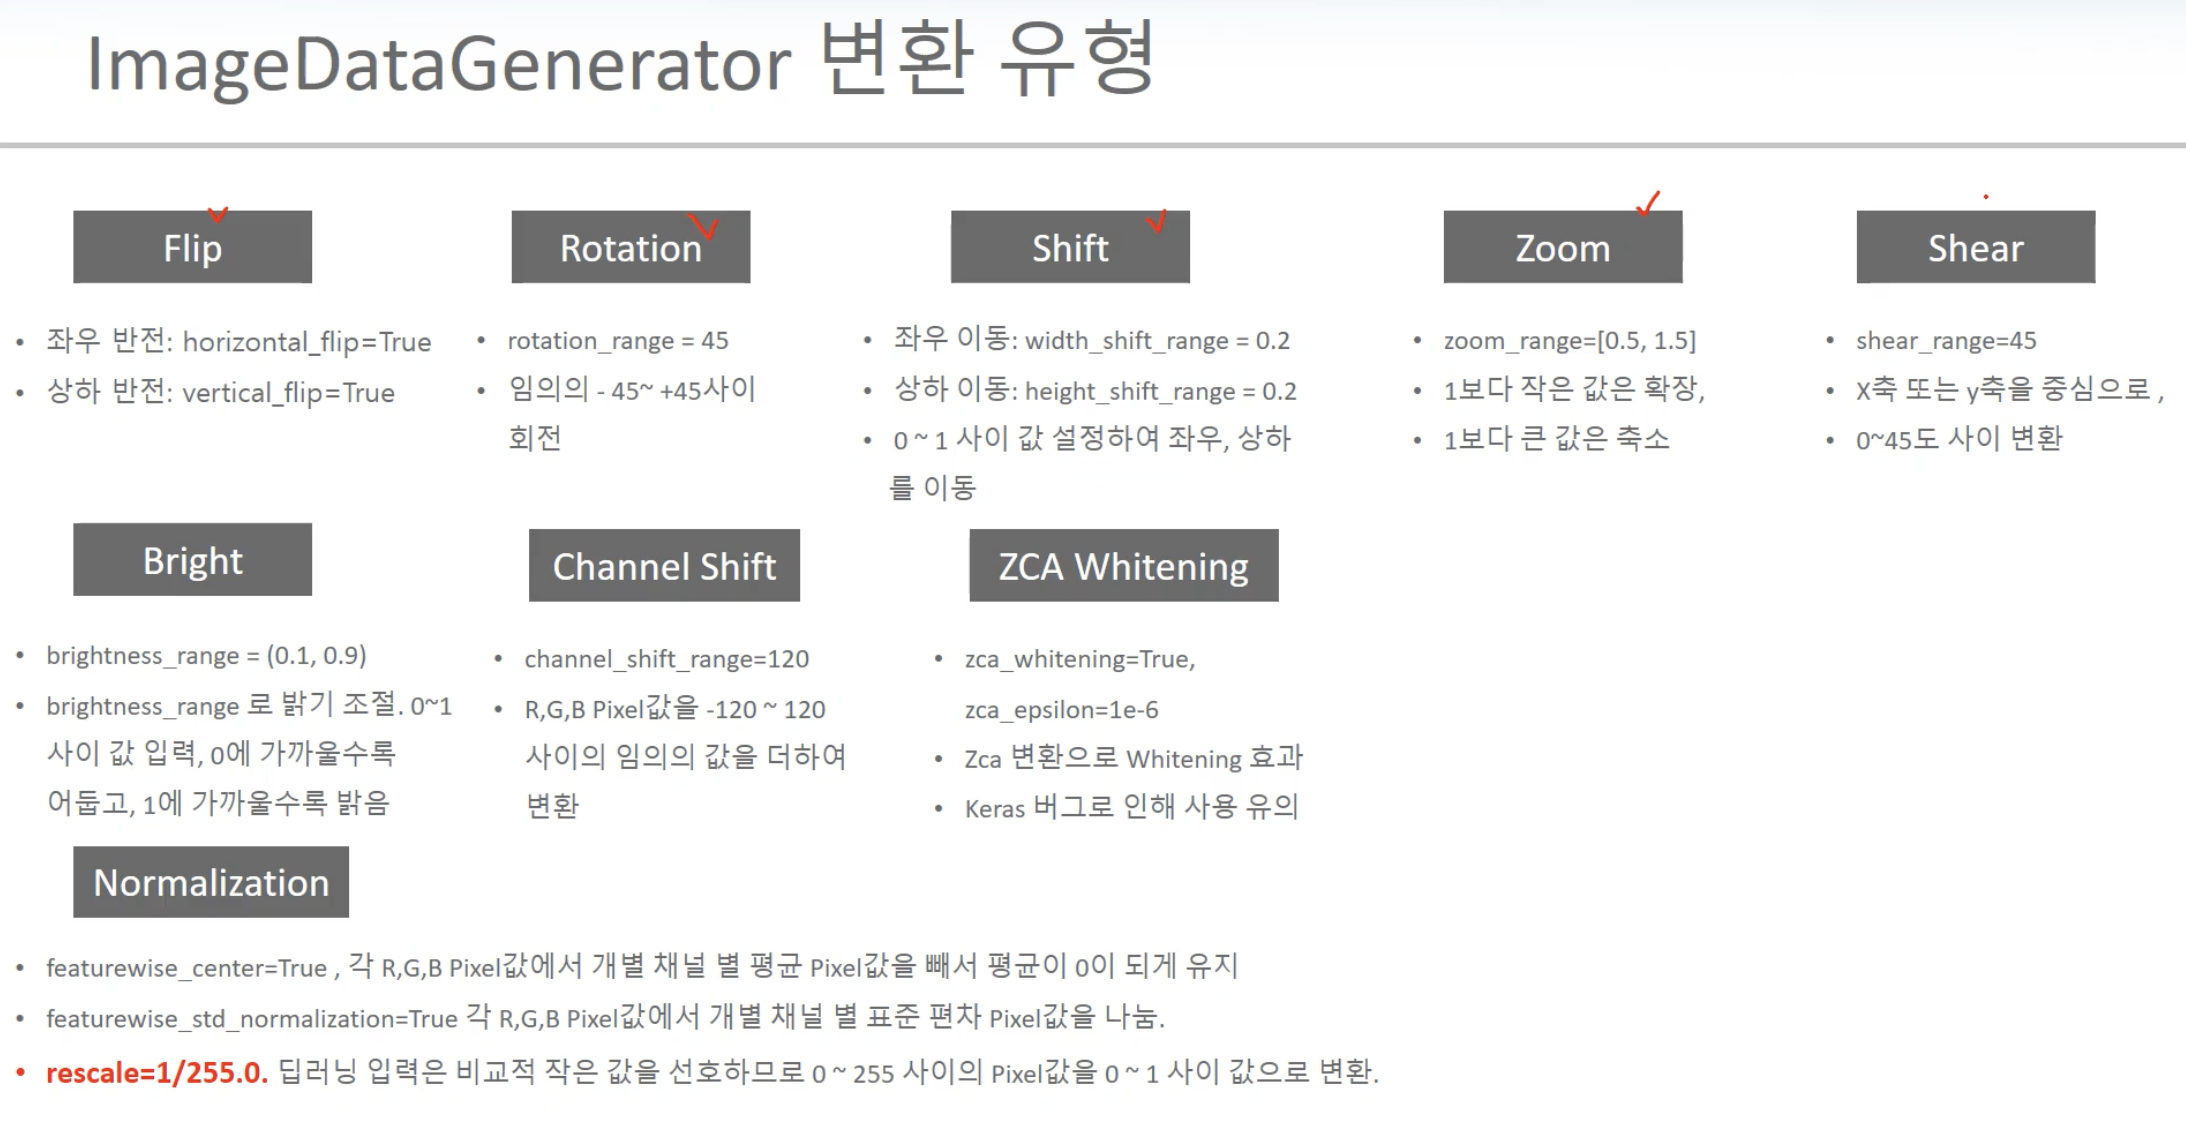
flip : vertical(up/down), horizontal(left/right)
crop : center, random
affine : rotate, translate, shear, scale(zoom)
-픽셀 레벨 변형
Bright,saturation,hue,grayscale,,,
keras의 대표적 이미지 변형 => Keras ImageDataGenerator : 각 요소들이 랜덤으로 적용되어 각 기능별로 변확 확률을 정할 수 X
Augmentation 전용 패키지 => Albumentation, ImgAug
Tensorflow Image Library
Keras의 ImageDataGenerator 특징
-keras에 쉽게 augmentation 적용 가능
-지원 augmentation 기능이 제한적이지만 기본적 기능만으로도 학습 데이터 셋에 충분히 효율적 augmentation 적용 가능
-keras는 초기 Data Augmentation 등의 preprocessing과 Data Loading을 ImageDataGenerator 객체와 model의 fit()/fit_generator()을 밀접하게 연결하여 적용함

보통은 이미지가 numpy array 안에 한번에 다 안들어감 //CPU&GPU에 한 번에 안들어감
메타 데이터에서 일단 ImageDataGenerator 적용한 후 flow_from_directory()/flow_from_dataframe()을 적용해주고나서 Iterator를 사용해 batch 크기만큼 데이터를 담은 후 fit_generator()를 사용해 tensor로 바꿔 GPU에 넣어줌
fit/fit_generator 적용 전까지는 preprocessing이나 data loading이 실제로 수행 X
ImageDataGenerator 적용 시 코드 구현 과정
-labels OHE 적용 함수 만듦
-get_train_valid_test_set 함수 : 분리 & OHE 적용
-ImageDataGenerator 적용 => train 에만! => test, valid는 augmentation 적용하면 안됨 rescale만 적용
-flow/flow_generator 적용 => 여기서 batch_size, shuffle 등 조절해줌
- 모델 생성, compile,$$
from tensorflow.keras.preprocessing.image import ImageDataGenerator

train_generator=ImageDataGenerator(
	rotation_range=20,
    horizontal_flip=True,
    rescale=1/255.0
    )
valid_generator=ImageDataGenerator(rescale=1/255.0)
test_generator=ImageDataGenerator(rescale=1/255.0)

flow_tr_gen=train_generator.flow(tr_image,tr_oh_labels,batch_size=BATCH_SIZE,shuffle=True)
flow_val_gen=valid_generator.flow(val_image,val_oh_labels,batch_size=BATCH_SIZE,shuffle=False)
flow_test_gen=test_generator.flow(test_image,test_oh_labels,batch_size=BATCH_SIZE,shuffle=False)
epoch / batch_size / step
6400개 원본 데이터 => batch_size=64
batch_size만큼 step = 100번 반복하면 전체 데이터 1번 가져오기 완성
그것을 epoch만큼 반복하는 것이 모델 학습
pretrained model 활용

vgg 16 모델 구조의 기본
model=VGG16(include_top=True, weights='Imagenet') //include_top=True : classification layer 쓸 것model=VGG16(include_top=True, weights='Imagenet')
model=VGG16(input_shape=(32,32,3),include_top=False,weights='imagenet')
model.summary()
from tensorflow.keras.applications.vgg16 import VGG16
from tensorflow.keras.applications.resnet50 import ResNet50
from tensorflow.keras.applications import VGG16, Resnet50V2, Xception

model=VHH16()
model.summary()

model=VGG16(input_shape=(32,32,3),include_top=False, weights='imagenet')
model.summary()
from tensorflow.keras.models import Sequential, Model
from tensorflow.keras.layers import Input,Dense,Conv2D,Dropout,Flatten,Activation,Maxpooling2D,GlobalAveragePooling2D
from tensorflow.keras.optimizers import Adam,RMSprop
from tensorflow.keras.layers import BatchNormalization
from tensorlow.keras.callbacks import ReduceLROnPlateau,earlyStopping,ModelCheckpoing,LearningRateScheduler
#inclode_top=False로 기존 imagenet용 classifier 층 모두 제거 & weight는 전이학습을 위해 imagenet 학습된 weight를 초기 weight를 사용
#input_tensor=Input(shape=(IMAGE_SIZE,IMAGE_SIZE,3))
#base_model=VGG16(inout_tensor=input_tensor, include_top=False,weights='imagenet')
base_model=VGG16(input_shape=(IMAGE_SIZE,IMAGE_SIZE,3),include_top=False,weights='imagenet')
bm_output=base_model.output
#base_model의 output을 입력으로 받아 분석할 데이터용 classification layer 재구성
x=GlobalAveragePooling2D()(bm_output)
x=Dropout(rate=0.5)(x)
x=Dense(5,activation='relu')(x)
output=Dense(10,activation='softmax')()
#model=Model(inputs=input_tensor, outputs=output)
model=Model(inputs=base_model.input,outputs=output)
model.summary()'DL 기본개념' 카테고리의 다른 글
| [RNN, LSTM, GRU] (3) | 2023.10.02 |
|---|---|
| GAN, WGAN, WGAN-GP (1) | 2023.09.19 |
| Generative Adversarial Network란? (0) | 2023.08.01 |
| GAN 학습자료 정리 (0) | 2023.07.27 |
| 딥러닝이란? (2) | 2023.06.19 |

